National Assessment of Educational Progress 2004-2007 System Clearance (KA)
National Assessment of Educational Progress 2004-2007 System Clearance (KA)
Geo-coding Survey of Vol2 Wave 3 (SES) Revised
National Assessment of Educational Progress 2004-2007 System Clearance (KA)
OMB: 1850-0790
THE NATIONAL ASSESSMENT OF
EDUCATIONAL PROGRESS
VOLUME II
(Supplemental Questionnaires-
Part of System Clearance Submittal
OMB# 1850-0790)
BACKGROUND QUESTIONS
FOR THE YEAR 2007 ASSESSMENT
(Wave 3)
Geo-coding Survey
School/State Personnel Pilot Geo-coding Users Survey

September 21, 2006
Questionnaire/Survey Contents
Survey Page
Wave 3b School/State Personnel Geo-coding Survey:
Survey Questions 3
Wave 3c Geo-coding Software User’s Manual:
Geo-coding Software User’s Manual 11
Wave 3b
Geo-coding Survey
Completed By
School/State Personnel


USES OF THE DATA
The purpose of this survey is to gather information on your experiences using the NCES NAEP geo-coding software. Your feedback is extremely important. The information you provide will be used by NCES’ contractor responsible for developing the geo-coding software to refine the current software, training material, and User’s Guide.
CONFIDENTIALITY
Geo-coding is the process of assigning Census block group information to the addresses of students in your school (or district or state) who are participating in NAEP (i.e., fourth-grade students, eighth-grade students, or twelfth-grade students). (A census block group consists of approximately 3,000 households.) When this information is gathered, it will be used to assign a particular set of SES variables to each student that are based on the aggregate census information. Once this is done, the block group designation will be removed from the data.
The collection of information in this survey is authorized by Public Law 107-110, 20 U.S.C. §9010. Participation is voluntary. You may skip questions you do not wish to answer; however, we hope that you will answer as many questions as you can. No information collected under this authority may be used for any purpose other than the purpose for which it was supplied. Information will be protected from disclosure by federal statute (42 U.S. Code 242m, Section 308d). No individual data about your students, schools, or profile that links the name, address, telephone number, or identification number with your responses will be reported.
PART I—Training and the User’s Guide
1. How helpful were the training and User’s Guide for explaining the following steps of the geo-coding process? (Please mark one response under Training and one response under User’s Guide on each line.) |
||||||||
|
Training |
User’s Guide |
||||||
|
Not at all Helpful |
Somewhat Helpful |
Helpful |
Very Helpful |
Not at all Helpful |
Somewhat Helpful |
Helpful |
Very Helpful |
|
○ |
○ |
○ |
○ |
○ |
○ |
○ |
○ |
|
○ |
○ |
○ |
○ |
○ |
○ |
○ |
○ |
|
○ |
○ |
○ |
○ |
○ |
○ |
○ |
○ |
|
○ |
○ |
○ |
○ |
○ |
○ |
○ |
○ |
|
○ |
○ |
○ |
○ |
○ |
○ |
○ |
○ |
|
○ |
○ |
○ |
○ |
○ |
○ |
○ |
○ |
|
○ |
○ |
○ |
○ |
○ |
○ |
○ |
○ |
2. For which single part of
the geo-coding process do you wish you had more information or
training? |
|
○ |
Creating a comma delimited CSV student address file |
○ |
Creating a unique name for your student address file collection |
○ |
Importing your address file |
○ |
Mapping columns |
○ |
Geo-coding addresses |
○ |
Editing failed addresses |
○ |
Viewing demographic statistics |
PART II—Creating or Importing Student Address Files
3. Which file formats are typically used at your school (or district or state) for storing student-address data? (Please mark one response on each line.) |
||
|
No |
Yes |
|
○ |
○ |
|
○ |
○ |
|
○ |
○ |
|
○ |
○ |
4. How many comma delimited CSV address files did you import into the software? |
|
|
□ □ |
5. On average, how long did it take you to prepare a comma delimited CSV file that could be used by the software? (Please mark one response.) |
|
○ |
No time at all, a comma delimited file was already available |
○ |
Less than 15 minutes |
○ |
15 to 30 minutes |
○ |
31 to 45 minutes |
○ |
46 minutes to 1 hour |
○ |
More than 1 hour |
6. How difficult was it for you to create a comma delimited CSV file? (Please mark one response.) |
|
○ |
Very difficult |
○ |
Somewhat difficult |
○ |
Not at all difficult |
7. Did the following
situations cause you problems when creating a student address
file? |
||
|
No |
Yes |
|
○ |
○ |
|
○ |
○ |
|
○ |
○ |
|
○ |
○ |
|
○ |
○ |
|
○ |
○ |
PART III—Editing Addresses
8. How many addresses were you assigned to geo-code? |
|
|
□ □,□ □ □ |
9. How many addresses did you successfully geo-code? |
|
|
□ □,□ □ □ |
For questions 10 and 11, if you geo-coded more than one address file, please only report on the file in which you had the greatest difficulty geo-coding.
10. What percentage of
addresses was the software able to geo-code the first time?
|
|
○ |
0-20% |
○ |
21-40% |
○ |
41-60% |
○ |
61-80% |
○ |
81-100% |
11. After editing the address information that failed geo-coding, what was the final percentage of addresses the system was able to geo-code? (Please mark one response.) |
|
○ |
0-20% |
○ |
21-40% |
○ |
41-60% |
○ |
61-80% |
○ |
81-100% |
For questions 12 and 13, if you geo-coded more than one address file, please base your responses on your experiences geo-coding all of them.
12. What were the top three reasons for geo-coding failure? (Please mark three responses.) |
|
○ |
All address information for a student was missing |
○ |
Street names were misspelled or incomplete |
○ |
Address numbers were incomplete or reversed |
○ |
City names were incomplete or abbreviated |
○ |
State names were incorrectly abbreviated |
○ |
Zip codes were incorrect |
○ |
Only P.O. Box information was available |
○ |
Other, please specify: _________________________________ |
○ |
Don’t know |
13. Overall, how long did it take you to edit addresses that failed geo-coding? (Please mark one response.) |
|
○ |
No time at all because there were no geo-coding failures |
○ |
Less than 15 minutes |
○ |
15 to 30 minutes |
○ |
31 to 45 minutes |
○ |
46 minutes to 1 hour |
○ |
More than 1 hour |
14. How did you correct addresses that failed geo-coding? (Please mark one response on each line.) |
||
|
No |
Yes |
|
○ |
○ |
|
○ |
○ |
|
○ |
○ |
|
○ |
○ |
|
○ |
○ |
|
○ |
○ |
|
○ |
○ |
|
○ |
○ |
|
○ |
○ |
PART IV—Usability of Software and Demographic Profile
15. Please indicate the extent to which you agree or disagree with the following statements about the usability and friendliness of the geo-coding software: (Please mark one response on each line.) |
||||
|
Strongly Agree |
Agree |
Disagree |
Strongly Disagree |
|
○ |
○ |
○ |
○ |
|
○ |
○ |
○ |
○ |
|
○ |
○ |
○ |
○ |
|
○ |
○ |
○ |
○ |
|
○ |
○ |
○ |
○ |
|
○ |
○ |
○ |
○ |
|
○ |
○ |
○ |
○ |
|
○ |
○ |
○ |
○ |
|
○ |
○ |
○ |
○ |
|
○ |
○ |
○ |
○ |
|
○ |
○ |
○ |
○ |
|
○ |
○ |
○ |
○ |
|
○ |
○ |
○ |
○ |
16. Can your school (or
district or state) use the information presented in the
demographic profile? |
|
○ |
No |
○ |
Yes |
17. How do you anticipate using the information in your local demographic profile? (Please provide a short response.) |
|
|
|
|
|
PART V—Background Information
The following questions will help us interpret your responses.
18. Do you work at the state, district, or school level? (Please mark one response.) |
|
○ |
State |
○ |
District |
○ |
School |
19. How good are you at using, preparing, and manipulating data files? (Please mark one response.) |
|
○ |
Not at all good |
○ |
Somewhat good |
○ |
Good |
○ |
Very good |
20. We are interested in knowing who is using the geo-coding software. Could you please tell us your full job title? |
|
|
Job Title:
|
Thank you very much for your time and valuable responses!
Wave 3c
Geo-coding Software
User’s Manual for
School/State Personnel
Geocoder v.0.5
Users Guide
1000 THOMAS JEFFERSON ST, NWWASHINGTON, DC 20007-3835TEL 202 403 5000FAX 202 403 5001WEBSITE WWW.AIR.ORG
|
Table of Contents
IV. The Main Application Window 3
Appendix A. Description of US Census Bureau Demographic Statistics 3
Introduction
The purpose of this document is to describe in detail how to use Geocoder. Geocoder is a desktop application developed by American Institutes for Research (AIR) that runs on a Microsoft Windows platform, and that offers geo-coding functionality.
Geo-coding is the process of taking a set of student addresses and converting them to Census community identifiers, which contain ZIP code and “census block group” information. This information, when gathered for a group of students, allows a demographic profile of the group to emerge.
It is important to understand that the Census community identifier tells one only about the geographic area in which the student resides and not about the student, the student’s family, or the student’s residence. Collected for a group of students, the Census community identifier supports the reporting of a rich array of demographic characteristics regarding the communities in which students live, including information about ethnicity, household income, educational attainment levels, and the like.
Geocoder reads an input file containing information about student addresses (i.e. an “Address File”), and produces two types of output files containing the results of the geo-coding process: 1) A demographic statistics export file, and 2) A geo-coding results export file, which is simply the input Address File with additional columns of -the geo-coding results data appended to it.
Geocoder does at no time share with another computer or transmit over the internet to another computer any of the data in the Address File, with the exception of the Zip code information. The collection of ZIP codes in an Address File is shared with an AIR web service in order to retrieve information needed to successfully geo-code the student addresses and produce statistical summaries.
Computer and Software Requirements
The computer and software that operates the geocoding application has been provided to you for this feasibility study. The laptop computer is a windows based machine which runs the geo-coding program as a stand alone application. Geocoder program reads an input file containing information about student addresses (i.e. an “Address File”), and produces two types of output files containing the results of the geo-coding process: 1) A demographic statistics export file, and 2) A geo-coding results export file, which is simply the input Address File with additional columns of -the geo-coding results data appended to it.
Using the Geocoder Software
To run Geocoder:
Double-click the Geocoder icon on the desktop, or from the “Start” menu, click on Start>Programs>AIR>Geocoder
The Main Application Window
The figure below shows Geocoder’s main application window.
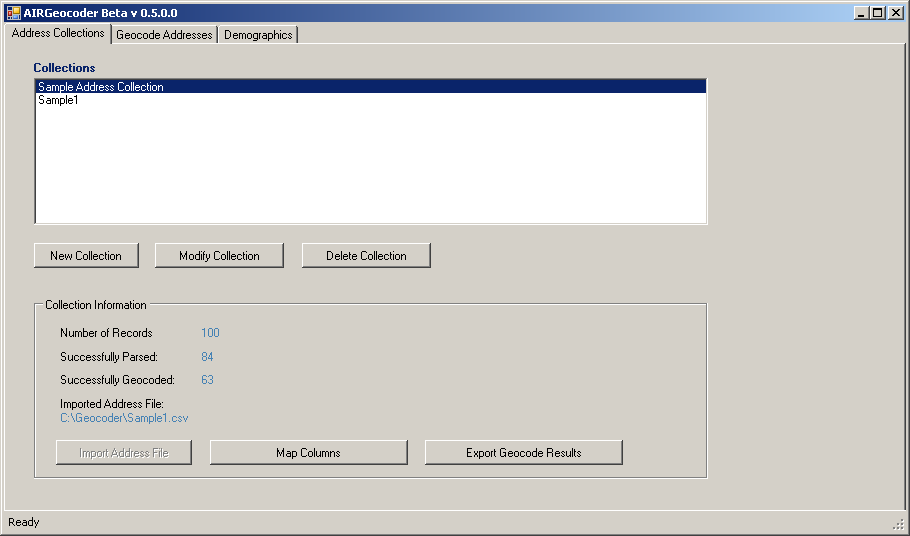
The main application window has three tabs: “Address Collections”, “Geocode Addresses”, and “Demographics”. The “Geocode Addresses” tab appears only when a collection with an imported address file is selected. The “Demographics” tab appears only when a collection that has been geo-coded is selected.
Geo-coding Addresses
Geo-coding addresses using Geocoder consists of the following steps:
Create student address file
Create a unique name for your student address file collection
Import your address file
Map columns
Geo-code addresses
View geo-coding results
Edit failed addresses and retry geo-coding
View demographic statistics
Each of these steps is described in detail below.
Step 1: Create student address file
The address file must be in a comma-delimited (CSV) format. Many programs (e.g., Microsoft Excel) will allow you to create such a file by using “Save As” or “Export” command, and selecting “Comma delimited (CSV)” format.
The Address File may contain any amount of information about students, but at a minimum must contain the following five pieces of information (each in its own column):
A unique address record identifier (e.g. Student Id)
Street Address,
City,
State,
Zip Code
The first row of the file should contain the column headers (i.e., the column names) for each of the columns in the file. Each subsequent row within the file should contain address information for a single student record.
Below is an example of a student address file format:
Student Id. |
Street Address |
City |
State |
Zip Code |
|
|
|
|
|
|
|
|
|
|
|
|
|
|
|
|
|
|
|
|
Step 2: Create a unique name for your student address file collection
The Geocoder program requires that you give an address file you geo-code a unique name. To create a unique name for a given address file:
From the “Address Collections” tab, click on the “New Collection” button.
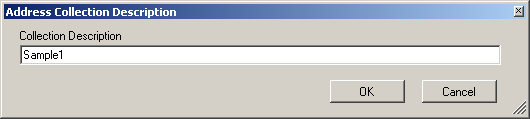
Enter a unique descriptive name that helps you distinguish the address file you will import into this collection, and select “OK”.
The new collection name appears in the “Collections” list.
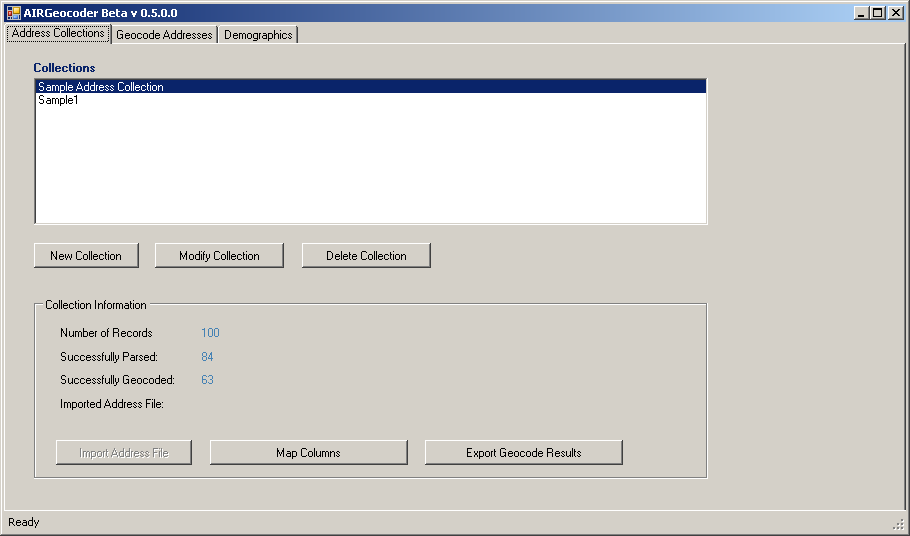
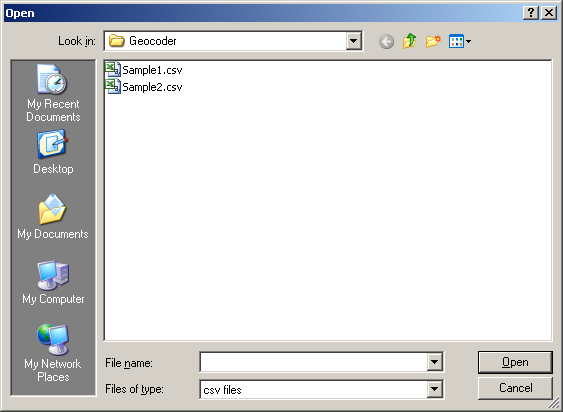
Step 3: Import your address file
Select the name of the new address collection (created in Step 2, above) from the “Collections” list.
Click on the “Import Address File” button on the “Address Collections” tab. Choose the name of your address file and click “Open.
Once the file is imported into the selected collection, the application will display a confirmation dialog box.

Click “OK” to return to the main application window.
Step 4: Map Columns
On the “Address Collections” tab, click on the “Map Columns” button to bring up the “Column Selection” window shown below.
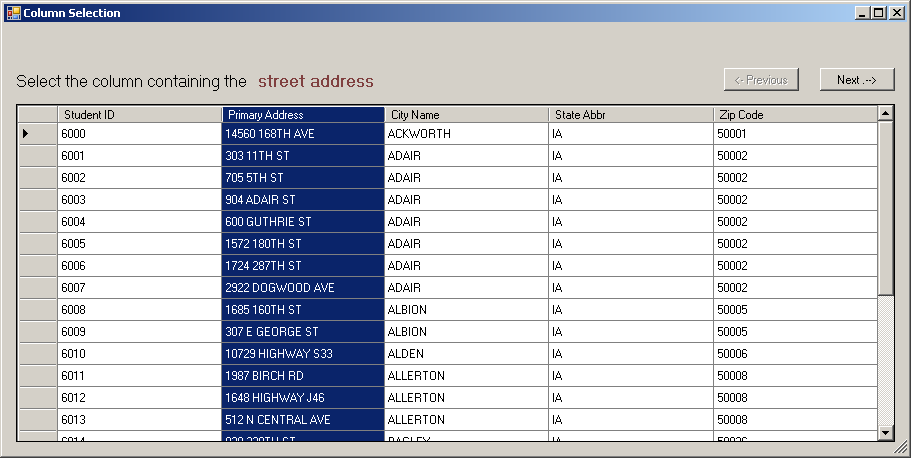
Carefully match the columns in your files with the column field highlighted in red at the top of the page. You will be asked to highlight the Street address, City, State, or Zip Code columns.
Use your cursor to highlight the requested field and click the “Next” button.
Highlighting the column indicates which address component has been selected.
Once all columns have been mapped, the “Next” button changes to a “Finish” button. Click on the “Finish” button to return to the main application window.
If you map a column incorrectly click the “Previous” button and highlight the correct column.
Step 5: Geo-code Addresses
Click on the “Geocode Addresses” tab, to bring up the address collection detail page shown below.
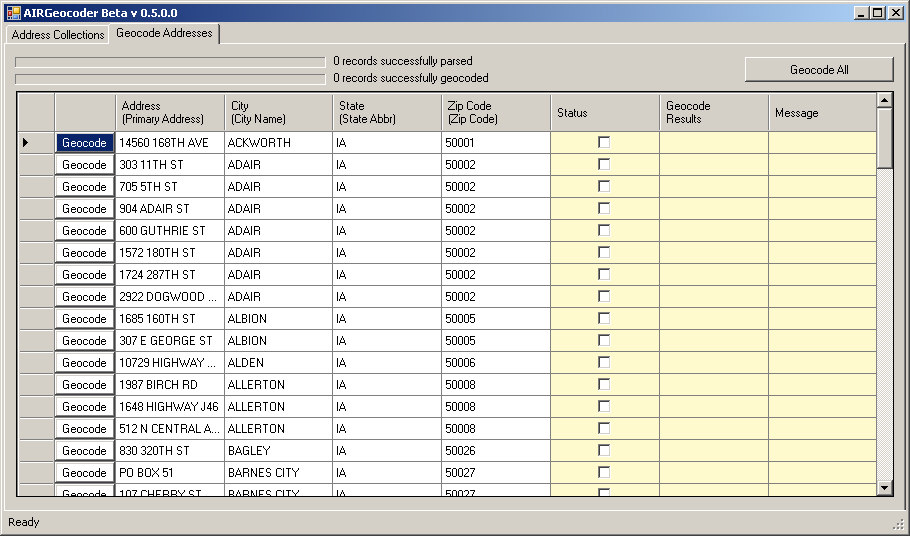
To geo-code all addresses, click on the “Geocode All” button. To geocode an individual address record, click on the “Geocode” button to the left of the desired record. The screen below appears.
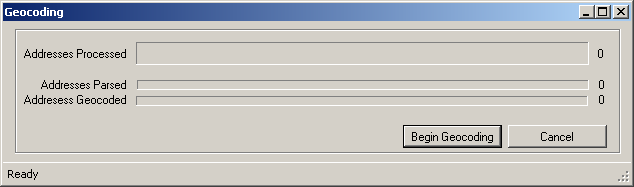
Click on the “Begin Geocoding” button.
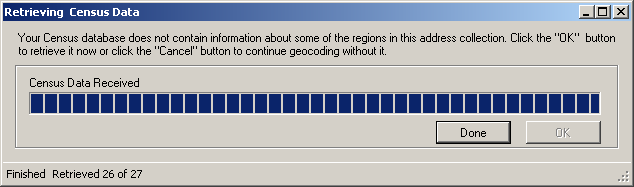
The application reviews each of the addresses in your file, and checks if Census data for all of the ZIP codes in the collection is available on your computer. If so, the application proceeds with geo-coding. If one or more of the ZIP codes in your collection does not have Census data for the information that was load on your computer when you started the Geocoder, the following dialog box will appear.
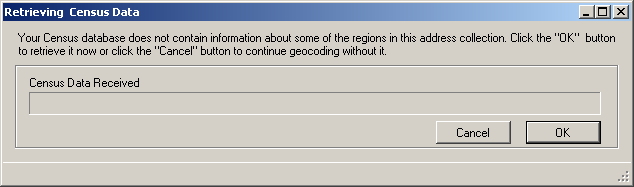
Click “OK” to download the missing Census address data for the additional Zip codes. Upon completion, the following “Cancel” button turns to “Done”.
Click the “Done” button to proceed with geo-coding. The following dialog box comes up to display progress.
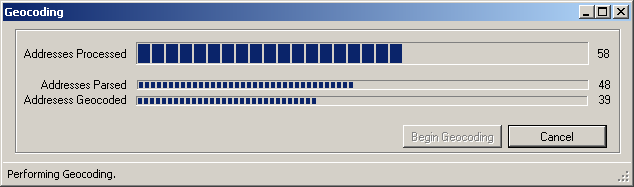
During the geo-coding process you will be able to monitor the status of the program. The program first processes (“parses”) the text of the address in order to interpret its components (e.g., the street number), and then identifies (“geo-codes”) where the address is located. The “% successfully parsed” and “% successfully geocoded” progress bars reflect the geo-coding status.
When the geo-coding process is completed the “Cancel” button will turn to “Done”. Click on the “Done” button to return to the address collection detail page and view the results.
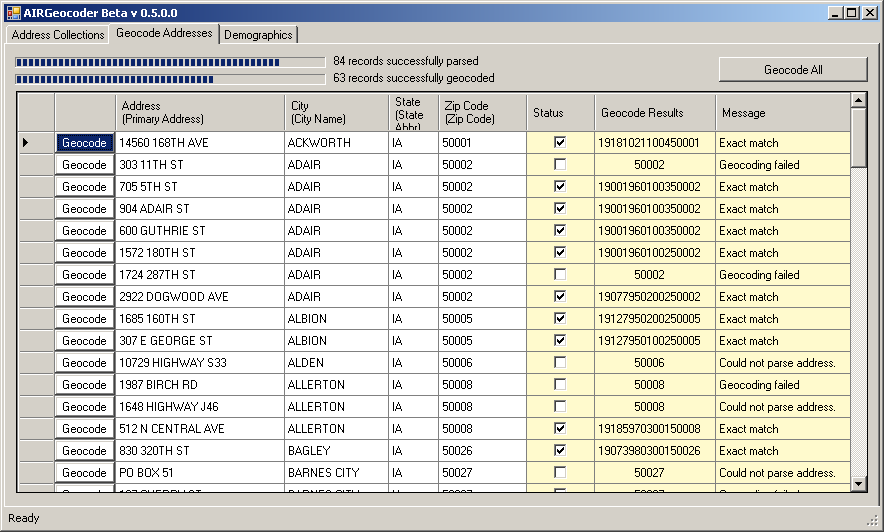
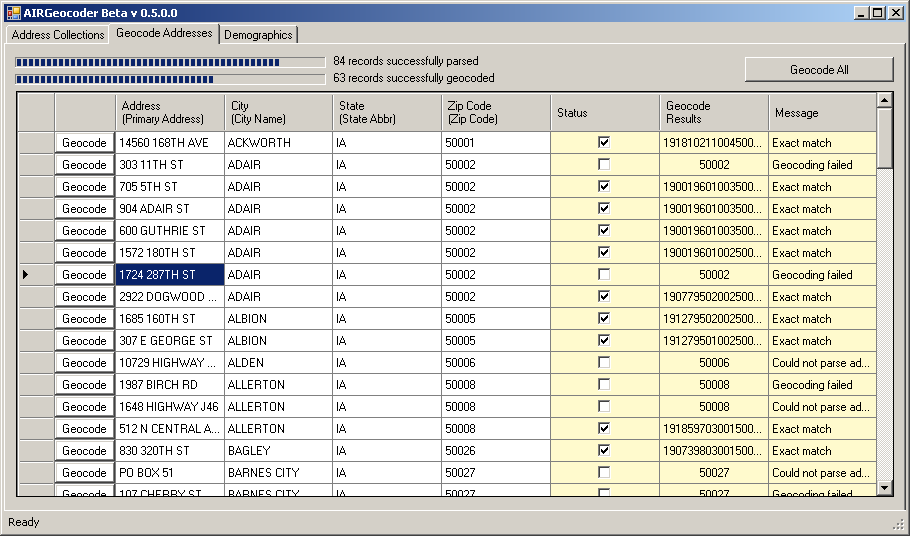
Step 6: View geo-coding results
Geo-coding results are displayed in the last three columns of the screen above.
The “Status” column shows whether the given address was geo-coded. If the address was geo-coded a check will appear in the box. If the box is blank the address was not able to assign a Census Community Identifier.
The “Geocode Results” column shows the Census Community Identifier for the given address, as determined by the application.
The “Message” column shows one of the following messages regarding the geo-coding effort on the given address.
“Exact match”
“Geocoding failed”
“Could not locate house number”
“Could not locate zip code”
“Could not parse address”
To easily identify all addresses that were not successfully geocoded, select the Status column header to sort by Status. To sort by other fields:
Click on the desired column heading to sort in ascending order.
Click same column heading again to reverse sorting order.
Step 7: Edit failed addresses and retry geo-coding
Editing the addresses that failed geo-coding during the initial attempt will require that you verify that each of the failed addresses contains the proper street address, city name, state, and zip code.
In order to edit an address and retry geo-coding:
Click on the address you want to change.
Change the data in the field that reflects the correct address information. The change is automatically saved.
Click the “Geocode” button to the left of the address (or the “Geocode All” button if multiple addresses have been modified).
Check the geo-coding results to verify success
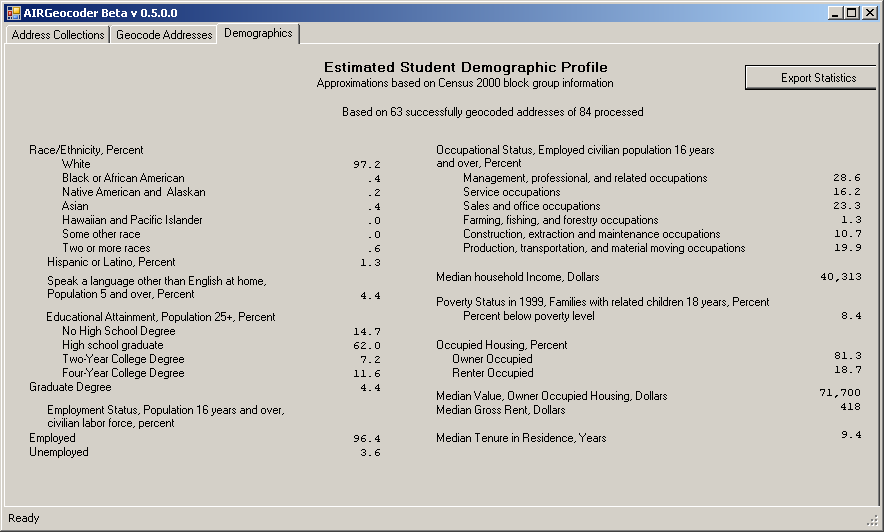
Step 8: View demographic statistics
Click on the “Demographics” tab. The screen that appears (shown below) displays the demographic profile for the selected address file collection that you geo-coded. Each of your address collections that have been geo-coded will have a demographic profile. (See Appendix A for interpretation of the profile elements).
Exporting Results
Geocoder provides the following export capabilities. In both cases, the end result is a comma-delimited (CSV) file containing the respective output.
Export geo-coding results
Export demographic statistics
1. To export geo-coding results
Select desired address collection from the “Address Collections” tab.
Click on the “Export Geocode Results” button. The application brings up a “Save As” dialog box.
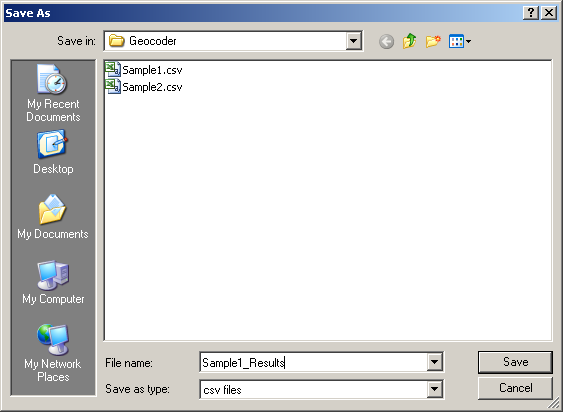
Enter desired file name and location and click “Save”. The application saves the geo-coding results in the specified file name and location.
2. To export demographic statistics
Select desired address collection from the “Address Collections” tab.
Click on the “Demographics” tab to bring up the screen below.
Click on the “Export Statistics” button. The application brings up a “Save As” dialog box.
Enter desired file name and location and click “Save”.
The application saves the demographics statistics in the specified file name and location.
Getting Help
If you have any questions about the operation of the software, please call the toll free Geocoding support desk at 1-866-770-6077 or send email to geocodesupport@air.org. You can also contact Steve Davis at 919-606-6880.
Appendix A. Description of US Census Bureau Demographic Statistics
Race/Ethnicity
An approximation of the ethnic/racial composition of the communities in which students live. The demographic statistics presented for race are created using data from the whole population within the communities your students are from. As such, the data presented should be interpreted as a measure of the racial composition of the community, rather than the racial makeup of students in your database. All people who indicated when filling out the Census that they were ethnically Hispanic or Latino, regardless of their race, are included in the “Hispanic or Latino” category.
Language Other Than English Spoken at Home
This statistic is an approximation of the percentage of the population aged 5 to 17 in the neighborhoods your students live in that speak a language other than English at home.
Educational Attainment
These statistics provide approximations of the degrees of educational attainment for members of your students’ communities aged 25 and over. The “No High School Degree” category includes all people who indicated when they filled out the 2000 Census that that they did not attain a high school degree or equivalent. The “High School Degree” category includes people in the communities who indicated that they achieved a high school degree or its equivalent, and those that indicated that they had some college but no degree. The “Two-Year College Degree” and “Four-Year College Degree” categories include people who received Associates Degrees and Bachelor degrees, respectively. The “Graduate Degree” category encompasses those people with Master’s degrees, professional degrees, and doctorates.
Employment Status
Statistics on employment status are approximations of labor force participation rates among members of the civilian labor force aged 16 and over within the communities your students are from. The category “unemployed” does not include those people in the communities who are completely out of the labor force and not looking for a job. The category “employed” does not include members of the community who are in the Armed Forces.
Occupational Status
The occupational status information is an approximation of the percentages of people in the communities who work in certain broad categories of occupations. All civilian occupations fall into one of these six categories. Due to the large number of possible occupations, the percentages of people in the community in specific occupations are not presented. Only information on people who are aged 16 and older, and are in the civilian labor force is presented.
Household Income
The description of household income presents an approximation of the median 1999 household income for households in your students’ neighborhoods. A household consists of all the people who occupy a housing unit. As described by the Census: A household includes the related family members and all the unrelated people, if any, such as lodgers, foster children, wards, or employees who share the housing unit. A person living alone in a housing unit, or a group of unrelated people sharing a housing unit such as partners or roomers, is also counted as a household. The count of households excludes group quarters.1
Poverty Status in 1999
This statistic provides an approximation of the poverty rates in 1999 for the communities in which your students live. The Census Bureau determines who is in poverty using a set of income thresholds that vary by family size and composition.2 The calculation is based on total family income. If total family income for a family of a specific size is less than the threshold determined for a family of that size, the family is in poverty. For individuals that do not live with family members, their own income is compared with the appropriate threshold. The geocoding software does not present details about the poverty status of students in you database, rather the percent generated provides information about the poverty rates in the students’ communities.
Occupied Housing
These statistics provide approximations of home ownership and rental rates for the communities in which your students live. An occupied housing unit is described by the Census Bureaus as: a housing unit that is the usual place of residence of the person or people living in it at the time of enumeration, even if the occupants are only temporarily absent; for example, away on vacation. Occupied rooms or suites of rooms in hotels, motels, and similar places are classified as housing units only when occupied by permanent residents; that is, individuals for whom the facility is their usual place of residence.3 Vacant housing units are not included in this measure.
Value, Owner Occupied Housing
These statistics provide approximations to the median dollar value in the year 2000 of houses in your students’ neighborhoods that are primary residences. The data here are based on what the respondents reported as the value of their property if they were to sell it.
Gross Rent
Gross rent approximates the median amount of cash rent that was paid by all rent-payers in the communities where your students live. The values are based on year 2000 dollars and have not been adjusted for inflation. The amounts include any money that is included in the rent for food or utilities. Only housing units where the occupants indicated that they were paying cash rent are included in this calculation.
Tenure in Residence
This statistic approximates the median length of time that members of your students’ neighborhoods had lived in their homes at the time of the 2000 Census. It is calculated as the difference between the median year that the respondents indicated on the Census that they moved into their homes and the year 2000, when the Census data was collected. Higher values reflect less turnover in residences; lower values reflect more turnover.
1 U.S. Census Bureau (2005). Decennial Management Division Glossary. Retrieved on April 1, 2006 from http://www.census.gov/dmd/www/glossary.html#
2 U.S. Census Bureau. (2005) How the Census Bureau Measures Poverty (Official Measure). Retrieved on April 1, 2006 from http://www.census.gov/hhes/www/poverty/povdef.html
3 U.S. Census Bureau (2005). Decennial Management Division Glossary. Retrieved on April 1, 2006 from http://www.census.gov/dmd/www/glossary.html#
| File Type | application/msword |
| File Title | THE NATIONAL ASSESSMENT OF |
| Author | joconnell |
| Last Modified By | DoED |
| File Modified | 2006-09-26 |
| File Created | 2006-09-26 |
© 2026 OMB.report | Privacy Policy